Project Documentation
Explainable smart contract vulnerability detection: classifier (TF-IDF + LR), feature importance, and a fine-tuned rationale LLM for human-friendly explanations.
Overview
This project analyzes smart contracts for security vulnerabilities and explains predictions in plain language. It uses (1) a TF-IDF + Logistic Regression classifier for vulnerability labels, (2) feature importance from that classifier for interpretability, and (3) an optional rationale model—a fine-tuned Large Language Model (LLM)—to generate natural-language explanations. The rationale model is based on google/flan-t5-base and is trained only on this project’s smart-contract data.
Model & What the LLM Does
The rationale model (LLM)
The rationale model is a seq2seq (sequence-to-sequence) LLM: it takes a text prompt and generates a text response. In this project the prompt is: contract excerpt + predicted vulnerability + top features; the response is a short, human-friendly explanation (what was found, what it means, what to do next).
Base model: google/flan-t5-base. Flan-T5 is a family of instruction-tuned language models from Google. The “base” size is mid-scale (~250M parameters), suitable for running on a single GPU and for task-specific fine-tuning.
How the model is trained
Training is fine-tuning: we start from the pre-trained flan-t5-base weights and train on our own dataset of (prompt, response) pairs. Each pair is built from a smart contract and the classifier’s prediction + feature importance; the response is a structured explanation (from a template or from a previous run). The script uses Hugging Face Transformers (Seq2SeqTrainer, AutoModelForSeq2SeqLM) with:
- Cross-entropy loss on the target explanation tokens
- Labels padded with
-100so padding is ignored by the loss - Gradient clipping (
max_grad_norm=1.0) and optional bf16 or fp16 for stability
After training, the model is saved under backend/artifacts/rationale_model/. The web app loads this checkpoint and uses it to generate explanations when the user enables “Explanations” and runs an analysis.
Purpose
The rationale model’s purpose is to turn the classifier’s output (label + feature importance) into human-readable explanations so that developers and auditors can quickly understand why a contract was flagged and what to do next, without interpreting raw feature weights. It supports explainable AI (XAI) and trust in the system.
Where Is the Dataset?
Two datasets are involved:
- Classifier training: Smart contract source + vulnerability labels in JSONL under
data/processed/, e.g.sc_4label.train.jsonl,sc_vuln_8label.train.jsonl(and.val,.test). Original CSVs:data/SC_4label.csv,data/SC_Vuln_8label.csv. - Rationale model training: A derived dataset of (prompt, response) pairs, built by
backend/scripts/build_rationale_dataset.pyfrom the same contract JSONL and the trained classifier. Outputs go todata/processed/rationale_sc_4label/ordata/processed/rationale_sc_vuln_8label/asrationale.train.jsonl,rationale.val.jsonl,rationale.test.jsonl.
So the rationale model is trained only on data that “suits” this project: smart contract vulnerability analysis, with prompts and responses tailored to that task.
Hyperparameters
Main hyperparameters for the rationale model training script (train_rationale_model.py):
| Argument | Default | Description |
|---|---|---|
--model_name | google/flan-t5-base | Base seq2seq model to fine-tune. |
--num_train_epochs | 2.0 | Number of full passes over the training set. |
--learning_rate | 2e-5 | Peak learning rate for the optimizer. |
--weight_decay | 0.01 | L2 regularization. |
--warmup_ratio | 0.03 | Fraction of steps for linear warmup (deprecated in newer libs; use warmup_steps). |
--per_device_train_batch_size | 1 | Batch size per GPU. |
--gradient_accumulation_steps | 16 | Effective batch size = batch_size × accumulation. |
--max_source_length | 512 | Max input (prompt) tokens. |
--max_target_length | 256 | Max output (response) tokens. |
--eval_steps / --save_steps | 200 | How often to evaluate and save checkpoints. |
--max_grad_norm | 1.0 | Gradient clipping for stability. |
--bf16 | auto | Use bf16 if GPU supports it (otherwise fp16); avoids NaN loss on many GPUs. |
Classifier (Vulnerability Model)
Besides the rationale LLM, the project uses a TF-IDF + Logistic Regression classifier to predict vulnerability labels from raw contract source. It is trained with backend/scripts/train_classifier.py on the same JSONL under data/processed/ (e.g. sc_vuln_8label.train.jsonl). The saved pipeline (TF-IDF vectorizer + LR) is stored as backend/artifacts/tfidf_lr.joblib. Feature importance is computed from the LR coefficients × TF-IDF features for the predicted label—no LIME or SHAP—so explanations are faithful to the model.
Architecture
High-level flow:
- Frontend (React, port 3000) — User pastes or uploads contract, toggles Explanations, clicks Analyze.
- Backend (FastAPI, port 8002) —
POST /analyzeruns the classifier, computes feature importance, optionally calls the rationale model, saves the run toruns/, returns prediction + explanations + rationale. - Runs — Each analysis is stored as a JSON file (run_id, timestamp, prediction, explanations, rationale, metrics). Users can list runs, view details, export PDF or JSON.
Diagrams are in docs/diagrams/ (e.g. analysis_workflow.svg, system_architecture.svg).
API Reference
| Method | Endpoint | Description |
|---|---|---|
| POST | /analyze | Analyze contract (form: source or file, explain, use_rationale, max_chars). Returns run with prediction, explanations, rationale. |
| GET | /runs | List all runs (run_id, timestamp, source_len, top_label). |
| GET | /runs/{run_id} | Get full run JSON. |
| GET | /runs/{run_id}/pdf | Download run report as PDF. |
| GET | /health | Health check (status: ok). |
| GET | /vocabulary | List classifier vocabulary (optional limit). |
| GET | /model/info | Classifier info (labels, vocab size, model type). |
| GET | /training/report | Training report JSON if present. |
Troubleshooting
- Training: loss 0, grad_norm nan — Use bf16 (script prefers it when the GPU supports it), ensure label padding is
-100in the data collator, and keepmax_grad_norm=1.0. Rebuild the rationale dataset and re-run training. - Rationale model not found / error in app — Train the rationale model first and save to
backend/artifacts/rationale_model/. The app loads from that path at startup or on first use. - Backend not reachable (frontend “Offline”) — Start the API:
python -m uvicorn backend.app.main:app --reload --port 8002. Ensure the frontend API base URL matches (default localhost:8002). - CUDA not available (PyTorch) — Install PyTorch with CUDA, e.g.
pip install torch --index-url https://download.pytorch.org/whl/cu124(adjust cu124 for your driver). Rationale training and inference are faster on GPU.
File Structure (explained)
Below is the project layout and what each part is for. Read this first to see where everything lives.
RP 44/
├── backend/
│   ├── app/                    # Application code (API + logic)
│   │   ├── main.py             # FastAPI app, /analyze, /runs, /health, etc.
│   │   ├── classifier.py       # TF-IDF + LR: train_multiclass(), load_classifier(), topk()
│   │   ├── dataset.py          # read_jsonl(), write_jsonl(), ContractExample
│   │   ├── explain.py          # feature_importance_explain() from pipeline
│   │   ├── rationale.py        # generate_template_rationale() for human text
│   │   ├── rationale_model.py  # RationaleModelService: load T5, generate()
│   │   ├── report.py           # run_to_pdf_bytes(), load_run()
│   │   ├── runs.py             # save_run() — write run JSON to disk
│   │   ├── settings.py         # Config: paths, rationale_device, tokens
│   │   └── labels.py           # Label normalization (e.g. for CSV import)
│   ├── scripts/                # Training and data prep (run from CLI)
│   │   ├── train_classifier.py      # Train TF-IDF + LR → tfidf_lr.joblib
│   │   ├── build_rationale_dataset.py # Build prompt/response JSONL for LLM
│   │   ├── train_rationale_model.py  # Fine-tune flan-t5-base → rationale_model/
│   │   ├── prepare_dataset.py       # Convert/prepare contract JSONL
│   │   └── convert_sc_csv.py        # CSV → JSONL with labels
│   ├── artifacts/              # Saved models and outputs (generated)
│   │   ├── tfidf_lr.joblib     # Trained classifier pipeline
│   │   ├── vocabulary.json     # Classifier vocab (word → index)
│   │   ├── training_report.json
│   │   └── rationale_model/    # Fine-tuned T5 (config, tokenizer, model.safetensors)
│   └── requirements.txt
├── data/
│   ├── SC_4label.csv, SC_Vuln_8label.csv   # Raw contract + label data
│   ├── processed/              # Processed datasets
│   │   ├── sc_4label*.jsonl, sc_vuln_8label*.jsonl   # Contract train/val/test
│   │   └── rationale_sc_4label/, rationale_sc_vuln_8label/  # Rationale train/val/test
│   └── README.md
├── frontend/
│   └── src/
│       ├── App.js, App.css
│       ├── pages/              # AnalysisPage, RunsPage, VocabularyPage
│       ├── components/        # Sidebar
│       └── services/api.js    # Calls to backend (analyze, runs, health)
├── runs/                      # One JSON file per analysis run (run_id.json)
├── examples/                  # Reference Solidity contracts (for pasting/upload)
└── docs/                      # This doc, diagrams, screenshots
Summary: backend/app is the running API and business logic. backend/scripts are one-off scripts for training and dataset building. backend/artifacts holds the trained classifier and rationale model. data/processed holds the JSONL used for training. frontend/src is the React UI. runs/ stores each analysis result.
Code Explanation & How the Full System Works
This section ties together where the code lives, what parameters and learning rates are used, and how the full pipeline works from data → training → inference.
1. Classifier (vulnerability model)
Where: Training in backend/scripts/train_classifier.py; logic in backend/app/classifier.py.
What it does: train_classifier.py calls train_multiclass() in classifier.py. That function builds a scikit-learn Pipeline: TfidfVectorizer (ngram_range=(1,2), max_features, min_df=2) then LogisticRegression (max_iter=2000). There is no explicit learning rate in the script—LogisticRegression in sklearn uses its default solver and C (inverse regularization). The only key hyperparameters you pass are:
--train_jsonl,--val_jsonl,--test_jsonl— paths to contract JSONL.--artifacts_dir— directory wheretfidf_lr.joblib,vocabulary.json,training_report.jsonare written.--max_features(default 50000) — max vocabulary size for TF-IDF.
Output: backend/artifacts/tfidf_lr.joblib (pipeline + labels + vocab_map). The API loads this in main.py via get_classifier() → load_classifier(artifacts_path).
Code snippets:
# train_classifier.py — CLI args
ap.add_argument("--train_jsonl", required=True)
ap.add_argument("--artifacts_dir", required=True)
ap.add_argument("--val_jsonl", default=None)
ap.add_argument("--test_jsonl", default=None)
ap.add_argument("--max_features", type=int, default=50000)

pipe, labels, report = train_multiclass(
    args.train_jsonl, out_path,
    max_features=args.max_features,
    val_jsonl=args.val_jsonl, test_jsonl=args.test_jsonl,
)
# classifier.py — pipeline definition (no explicit learning rate)
pipe = Pipeline(
steps=[
("tfidf", TfidfVectorizer(ngram_range=(1, 2), max_features=max_features, min_df=2)),
("clf", LogisticRegression(max_iter=2000, n_jobs=1, verbose=1)),
]
)
pipe.fit(X_train, y_train)2. Feature importance (explain)
Where: backend/app/explain.py — single function feature_importance_explain(pipe, text, top_label, top_n).
What it does: Uses the same pipeline: TF-IDF transforms the input text, then the LogisticRegression coefficients for the predicted label are multiplied by the TF-IDF values to get per-token contributions. Returns a list of {feature, contribution}. No learning rate or training—pure inference using the already-trained pipeline. Used by the API when explain=True and by build_rationale_dataset.py when building prompts.
# explain.py — signature and key logic
def feature_importance_explain(pipe: Pipeline, text: str, top_label: str, top_n: int = 50) -> Dict[str, Any]:
    tfidf = pipe.named_steps.get("tfidf")
    clf = pipe.named_steps.get("clf")
    # ...
    X = tfidf.transform([text])
    feature_names = tfidf.get_feature_names_out()
    coef = clf.coef_[label_idx]
    # contributions = X * coef, sorted by |contribution|
3. Rationale dataset (prompt/response for LLM)
Where: backend/scripts/build_rationale_dataset.py. It imports from app.classifier, app.dataset, app.explain, app.rationale.
What it does: Reads contract JSONL (--in_jsonl), loads the classifier from --artifacts_path (default backend/artifacts/tfidf_lr.joblib). For each contract it: (1) runs the classifier and gets top label + confidence, (2) calls feature_importance_explain() to get top features, (3) builds a prompt (instruction + vulnerability + features + code excerpt) via build_prompt(), (4) builds a response with generate_template_rationale() (template text) when --target_mode template. Splits rows into train/val/test by hashing example id. Writes rationale.train.jsonl, rationale.val.jsonl, rationale.test.jsonl to --out_dir. Parameters: --max_code_chars (1200), --top_n_features (12), --train_pct/val_pct (80/10). This dataset is what the rationale model is trained on.
# build_rationale_dataset.py — per-example flow
pipe, _labels, _vocab = load_classifier(artifacts_path)
for ex in read_jsonl(in_jsonl):
    proba = pipe.predict_proba([ex.source])[0]
    top = topk(probs, k=3)
    fi = feature_importance_explain(pipe, ex.source, top_label=top_label, top_n=top_n_features)
    prompt = build_prompt(vulnerability=top_label, top_features=top_features, code=ex.source, ...)
    response = generate_template_rationale(top_label=top_label, confidence=top_conf, feature_importance=fi)
    # write {"prompt": ..., "response": ...} to train/val/test JSONL by stable_split(ex.id)
4. Rationale model training (LLM fine-tuning)
Where: backend/scripts/train_rationale_model.py. All training hyperparameters and the learning rate are defined here.
Parameters and learning rate (location in code):
- Learning rate:
--learning_ratedefault2e-5(line ~73). This is the peak learning rate; the trainer uses a scheduler withwarmup_ratio=0.03so LR ramps up then decays. - Model:
--model_namedefaultgoogle/flan-t5-base. - Sequence length:
--max_source_length512,--max_target_length256 (prompt and response token limits). - Epochs:
--num_train_epochs2.0. - Optimizer: AdamW with
weight_decay=0.01,warmup_ratio=0.03. - Batch size:
per_device_train_batch_size=1,gradient_accumulation_steps=16→ effective batch size 16. - Stability:
max_grad_norm=1.0(gradient clipping),label_pad_token_id=-100in the data collator (so padding in labels is ignored by the loss). - Precision: Script prefers bf16 if the GPU supports it, else fp16, to avoid NaN loss.
- Eval/save:
eval_stepsandsave_steps200,save_total_limit2.
Data flow: The script loads --train_jsonl and --val_jsonl (the JSONL produced by build_rationale_dataset.py). Each line has prompt and response. JsonlPromptResponseDataset tokenizes them with the T5 tokenizer (max_source_length, max_target_length) and returns input_ids, attention_mask, labels. Seq2SeqTrainer runs the training loop (forward, loss, backward, optimizer step) and saves the final model to --out_dir (typically backend/artifacts/rationale_model/).
# train_rationale_model.py — learning rate and main args
ap.add_argument("--learning_rate", type=float, default=2e-5)
ap.add_argument("--model_name", default="google/flan-t5-base")
ap.add_argument("--num_train_epochs", type=float, default=2.0)
ap.add_argument("--warmup_ratio", type=float, default=0.03)
ap.add_argument("--weight_decay", type=float, default=0.01)
ap.add_argument("--per_device_train_batch_size", type=int, default=1)
ap.add_argument("--gradient_accumulation_steps", type=int, default=16)
# train_rationale_model.py — Seq2SeqTrainingArguments (where LR is used)
training_args = Seq2SeqTrainingArguments(
output_dir=str(out_dir),
learning_rate=float(args.learning_rate), # 2e-5
weight_decay=float(args.weight_decay),
warmup_ratio=float(args.warmup_ratio),
num_train_epochs=float(args.num_train_epochs),
per_device_train_batch_size=int(args.per_device_train_batch_size),
gradient_accumulation_steps=int(args.gradient_accumulation_steps),
max_grad_norm=1.0,
bf16=bool(use_bf16),
fp16=bool(use_fp16),
# ...
)
data_collator = DataCollatorForSeq2Seq(..., label_pad_token_id=-100)5. Runtime: how the full system works
Where: backend/app/main.py is the entry point. It imports classifier, explain, rationale, rationale_model, report, runs, settings.
Flow when a user clicks Analyze:
- Request: Frontend sends
POST /analyzewithsource(or file),explain,use_rationale,max_chars. - Classifier:
get_classifier()loadstfidf_lr.joblib(cached).pipe.predict_proba([source])returns probabilities;topk()gives top labels. - Explain: If
explainis true,feature_importance_explain(pipe, source, top_label)returns the token contributions. That result is stored inexplanations["feature_importance"]. - Template rationale: If explain is true,
generate_template_rationale(top_label, confidence, feature_importance)produces the default human-readable text. That is used unless the rationale model is requested. - Rationale model (optional): If
use_rationaleis true,get_rationale_model()loads the T5 model frombackend/artifacts/rationale_model/. The API builds a prompt (vulnerability + top features + code excerpt) and callsrm.generate(prompt, max_new_tokens=220). The generated text replaces the template rationale. - Save and return:
save_run(runs_dir, run_data)writes the run (prediction, explanations, rationale, metrics) toruns/{run_id}.json. The same object is returned to the frontend. PDF export usesreport.run_to_pdf_bytes(run).
How the pieces relate: The classifier is trained first and saved to artifacts/. The rationale dataset is built from the same contract data and the trained classifier (so prompts contain the model’s predictions and feature importance). The rationale model is then trained on that dataset and saved to artifacts/rationale_model/. At runtime, the API uses the classifier for predictions, explain.py for feature importance, and either the template in rationale.py or the loaded T5 in rationale_model.py for the natural-language explanation. So: data → classifier training → rationale dataset build → rationale model training → API (classifier + explain + rationale) → frontend.
# main.py — /analyze flow (condensed)
@app.post("/analyze")
def analyze(source=None, file=None, explain=True, use_rationale=False, max_chars=12000):
    pipe, _labels, _vocab = get_classifier()
    proba = pipe.predict_proba([source])[0]
    top = topk(probs, k=3)
    top_label = top[0][0]
    if explain:
        explanations["feature_importance"] = feature_importance_explain(pipe, source, top_label=top_label)
        rationale = generate_template_rationale(top_label, confidence, feature_importance)
    if use_rationale:
        rm = get_rationale_model()
        model_rationale = rm.generate(prompt, max_new_tokens=220)
        rationale = model_rationale
    save_run(runs_dir, run_data)
    return run_data
Project Structure (summary)
backend/app/— API (main.py), classifier, explain, rationale, rationale_model, report, runs, settings.backend/scripts/— train_classifier.py, train_rationale_model.py, build_rationale_dataset.py, prepare_dataset.py, convert_sc_csv.py.backend/artifacts/— tfidf_lr.joblib, rationale_model/, vocabulary.json, training_report.json.data/processed/— Contract JSONL (sc_4label, sc_vuln_8label) and rationale JSONL (rationale_sc_*).frontend/src/— React app (Analysis, Vocabulary, Runs pages; api.js).docs/— This documentation, REQUIREMENTS_COMPLIANCE.md, diagrams.runs/— Saved analysis runs (JSON per run).
How to Start Training
- Prepare the rationale dataset (if not already done):
python backend/scripts/build_rationale_dataset.py --in_jsonl "data/processed/sc_vuln_8label.jsonl" --out_dir "data/processed/rationale_sc_vuln_8label" --target_mode template - Run training (from project root, with GPU recommended):
python backend/scripts/train_rationale_model.py --train_jsonl "data/processed/rationale_sc_vuln_8label/rationale.train.jsonl" --val_jsonl "data/processed/rationale_sc_vuln_8label/rationale.val.jsonl" --out_dir "backend/artifacts/rationale_model" - Optional: use
--bf16explicitly if your GPU supports it (e.g. RTX 30/40/50 series) for more stable training. The script will prefer bf16 when available to avoid NaN loss that can occur with fp16.
Training saves the final model and tokenizer to backend/artifacts/rationale_model/. The web app uses this path to load the rationale model when generating explanations.
Training Screenshots Explained
Two training runs are shown in the screenshots below. They illustrate the difference between a failed run (wrong precision/config) and a successful run.
Screenshot 1: Unsuccessful run (loss 0, grad_norm nan)
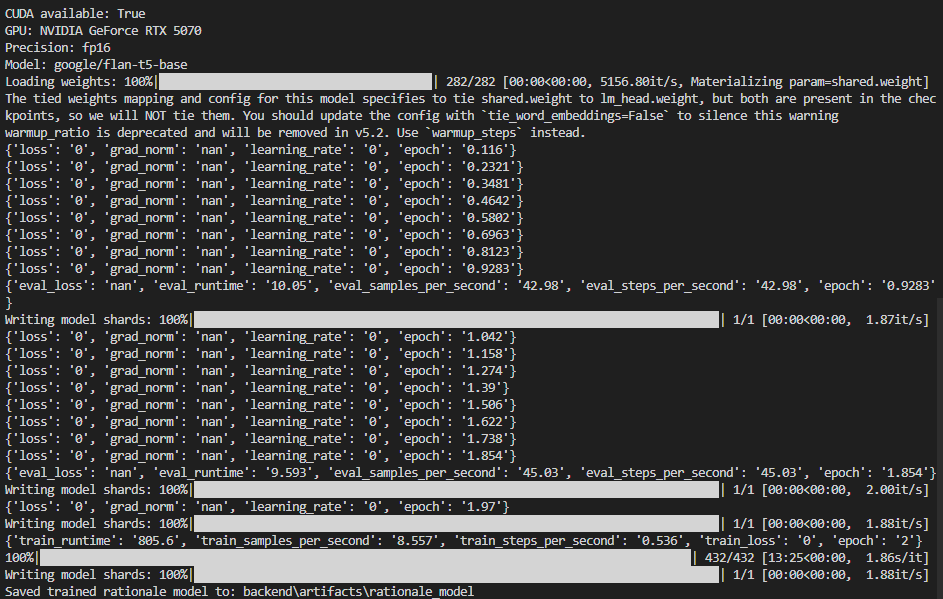
Screenshot 2026-02-16 005724 — Training with fp16 showing invalid metrics.
In this run you see:
- Precision: fp16 — 16-bit float; on some GPUs/datasets this can lead to numerical issues.
- loss: '0', grad_norm: 'nan', learning_rate: '0' — The optimizer is not updating weights properly. Often caused by label padding not set to
-100, or fp16 overflow producing NaNs. When gradients become NaN, loss and learning rate can be reported as 0. - eval_loss: 'nan' — Evaluation cannot compute a valid loss.
So the model did not learn in this run. The checkpoint saved here is effectively unchanged from the pre-trained model. Fixes applied in the project: use bf16 when available, set label_pad_token_id=-100 in the data collator, and use max_grad_norm=1.0.
Screenshot 2: Successful run (decreasing loss, valid metrics)
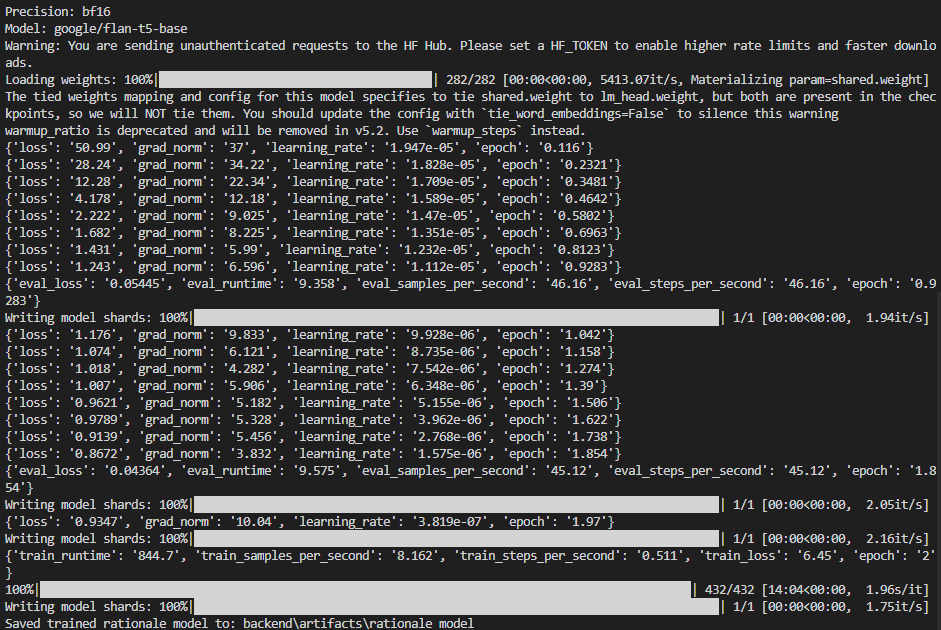
Screenshot 2026-02-16 014239 — Training with bf16 and healthy metrics.
In this run you see:
- Precision: bf16 — More stable than fp16; avoids the NaNs seen in the first screenshot.
- loss decreasing from ~51 down to ~0.87 — The model is learning. Each line is a logging step (e.g. every 25 steps).
- grad_norm in a normal range (e.g. 37 → 6) — No NaNs; gradients are healthy.
- learning_rate going from ~1.9e-5 down (warmup then decay) — Scheduler is working.
- eval_loss 0.054 and 0.043 — Validation loss is valid and improving.
- Saved trained rationale model to: backend\artifacts\rationale_model — Final model is written correctly and can be used by the app.
The warnings (tied weights, warmup_ratio deprecated) are harmless. The important point is that loss and eval_loss are real numbers and improve over time; that indicates a successful fine-tuning run.
Setup
One-time: install backend dependencies from backend/requirements.txt (e.g. pip install -r backend/requirements.txt). For GPU training and faster rationale inference, install PyTorch with CUDA. For the frontend, run npm install inside frontend/ once.
How to Run the Project
Run both the backend API and the frontend. Use two terminals (or run one in the background).
- Start the backend — From the project root (
C:\Reaserch\RP 44or your repo path):
Leave this running. You should see:python -m uvicorn backend.app.main:app --reload --port 8002Uvicorn running on http://127.0.0.1:8002. - Start the frontend — In a second terminal, from the project root:
The React app will open in your browser atcd frontend npm starthttp://localhost:3000(or show the URL in the terminal). - Use the app — Open
http://localhost:3000if it did not open automatically. The frontend talks to the API athttp://localhost:8002by default. You can change the API base URL in the sidebar if needed.
Summary: Backend = port 8002, Frontend = port 3000. Both must be running for full functionality.
Usage
Open the web app at http://localhost:3000. Paste or upload a smart contract, enable Explanations, and run analysis. You get the classifier’s top labels, feature importance, and—if the rationale model is trained and loaded—a natural-language explanation. Export results as PDF or JSON from the analysis view or from the Runs page.
Frontend Screenshots Explained
These screenshots show the SCXAI web app in use for Contract Analysis, using smart contracts from the project’s examples/ folder (e.g. OpenZeppelin-style Solidity files). The app runs in dark mode.
1. Contract Analysis — Input and options
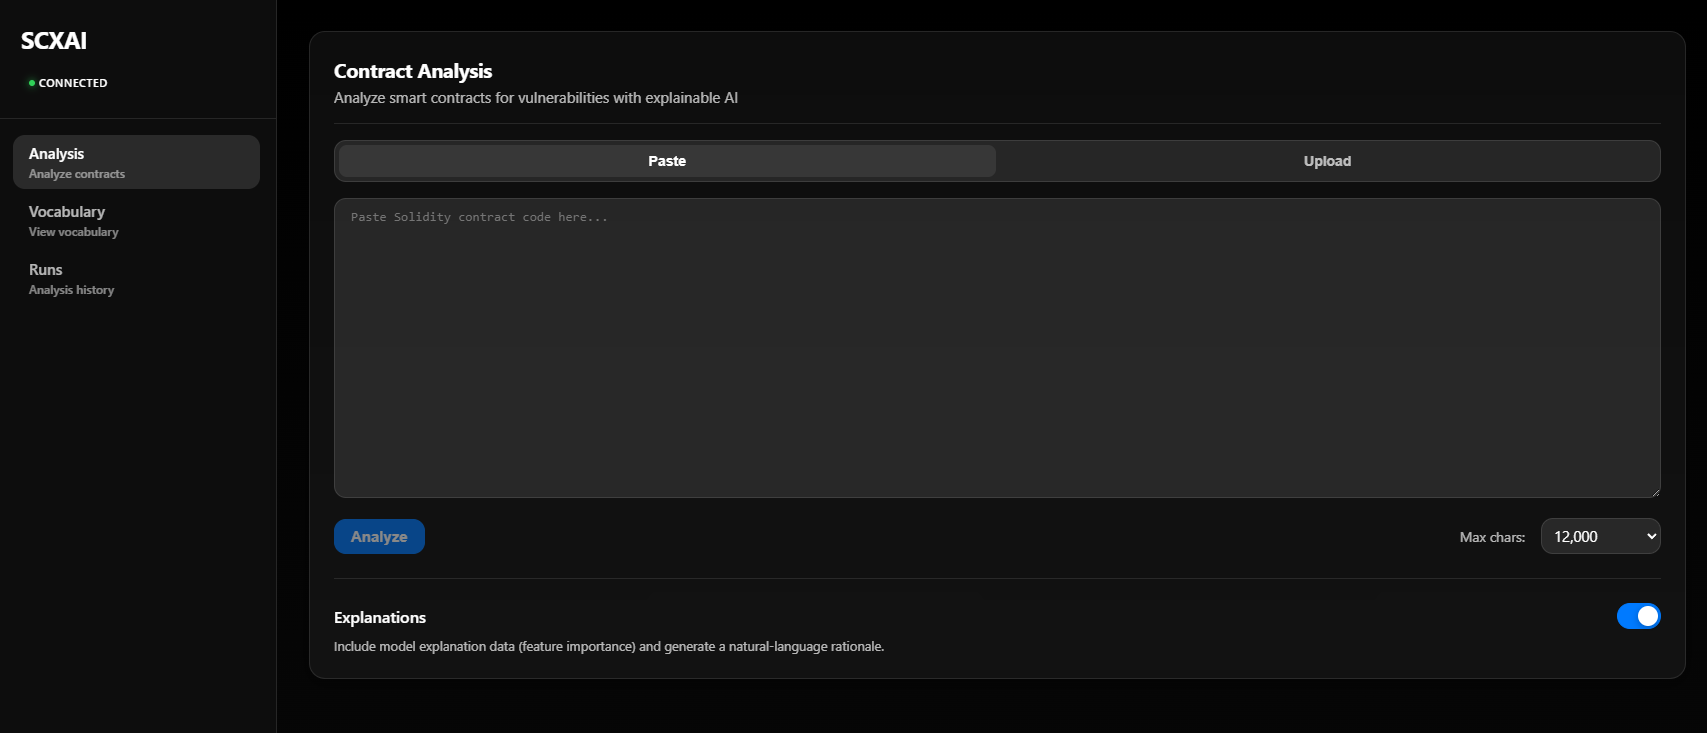
Screenshot 2026-02-18 233506 — Analysis page before running.
What you see: The main Contract Analysis screen. On the left, the sidebar shows SCXAI, connection status (CONNECTED in green when the backend is reachable), and navigation: Analysis (Analyze contracts), Vocabulary, Runs. The central area has two input modes: Paste (paste Solidity code into the text area) or Upload (upload a .sol file). Below the text area you set Max chars (e.g. 12,000) and click Analyze. The Explanations toggle is on so the response will include feature importance and the natural-language rationale. Contracts from examples/ (e.g. examples/finance/VestingWalletCliff.sol) can be pasted or uploaded here for analysis.
2. Analysis results — Prediction and explanation
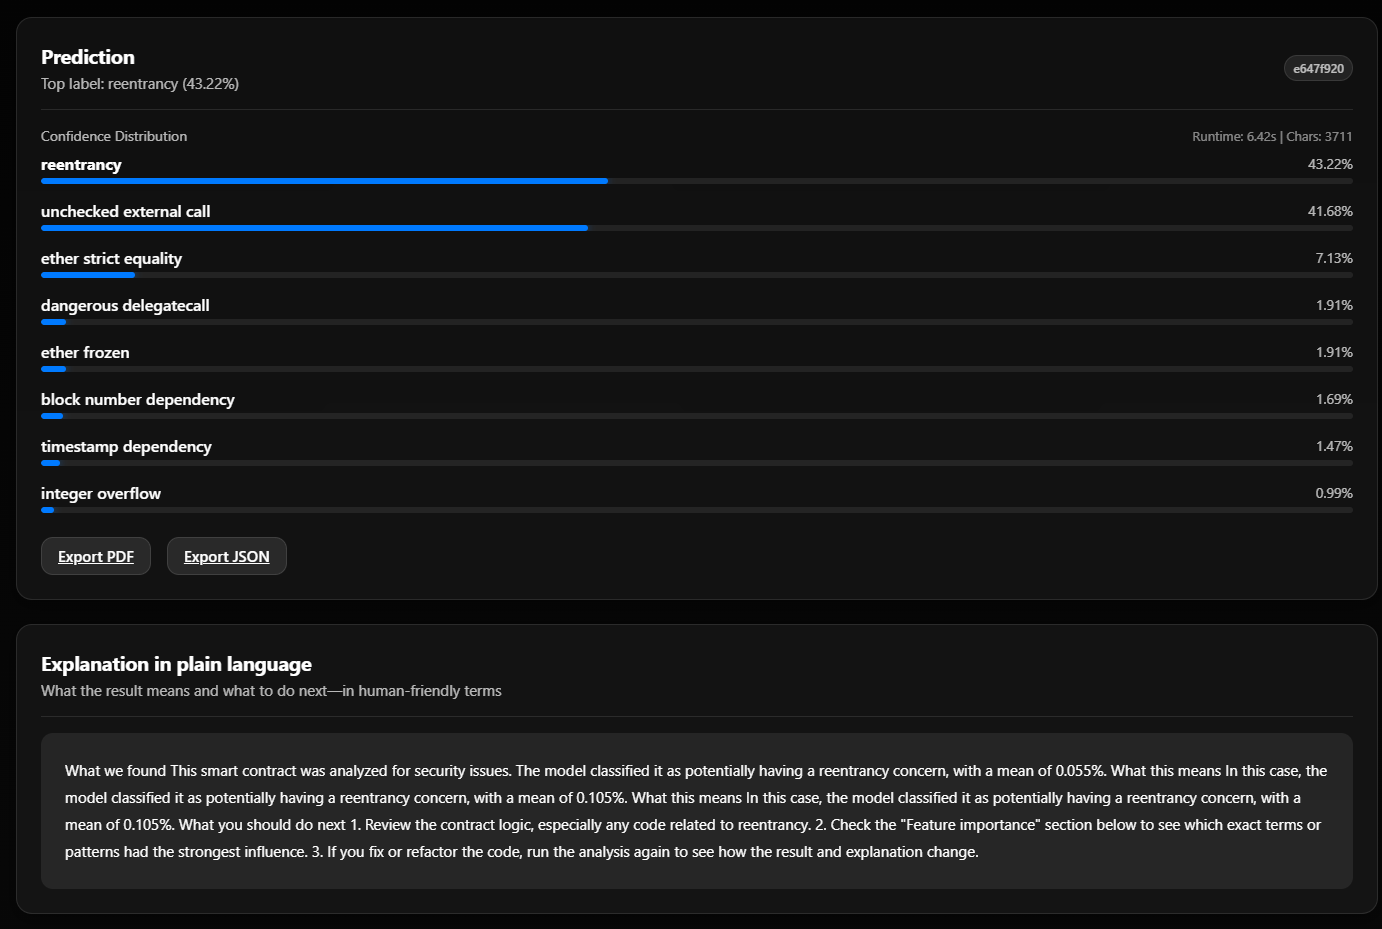
Screenshot 2026-02-18 233608 — After analyzing a contract.
What you see: After clicking Analyze, the Prediction section shows the top label (e.g. reentrancy at 43.22%) and a bar list of all vulnerability types with their confidence (e.g. unchecked external call 41.68%, ether strict equality 7.13%, and others). Top-right shows run id, Runtime (e.g. 6.42s), and Chars (e.g. 3711). Export PDF and Export JSON let you save the full report. Below, Explanation in plain language gives a short, human-friendly summary: what was found (e.g. reentrancy concern), what it means, and what to do next (review contract logic, check Feature importance, re-run after changes). This is the explainable AI (XAI) output—either from the template or from your trained rationale model.
3. Vocabulary — Learned tokens
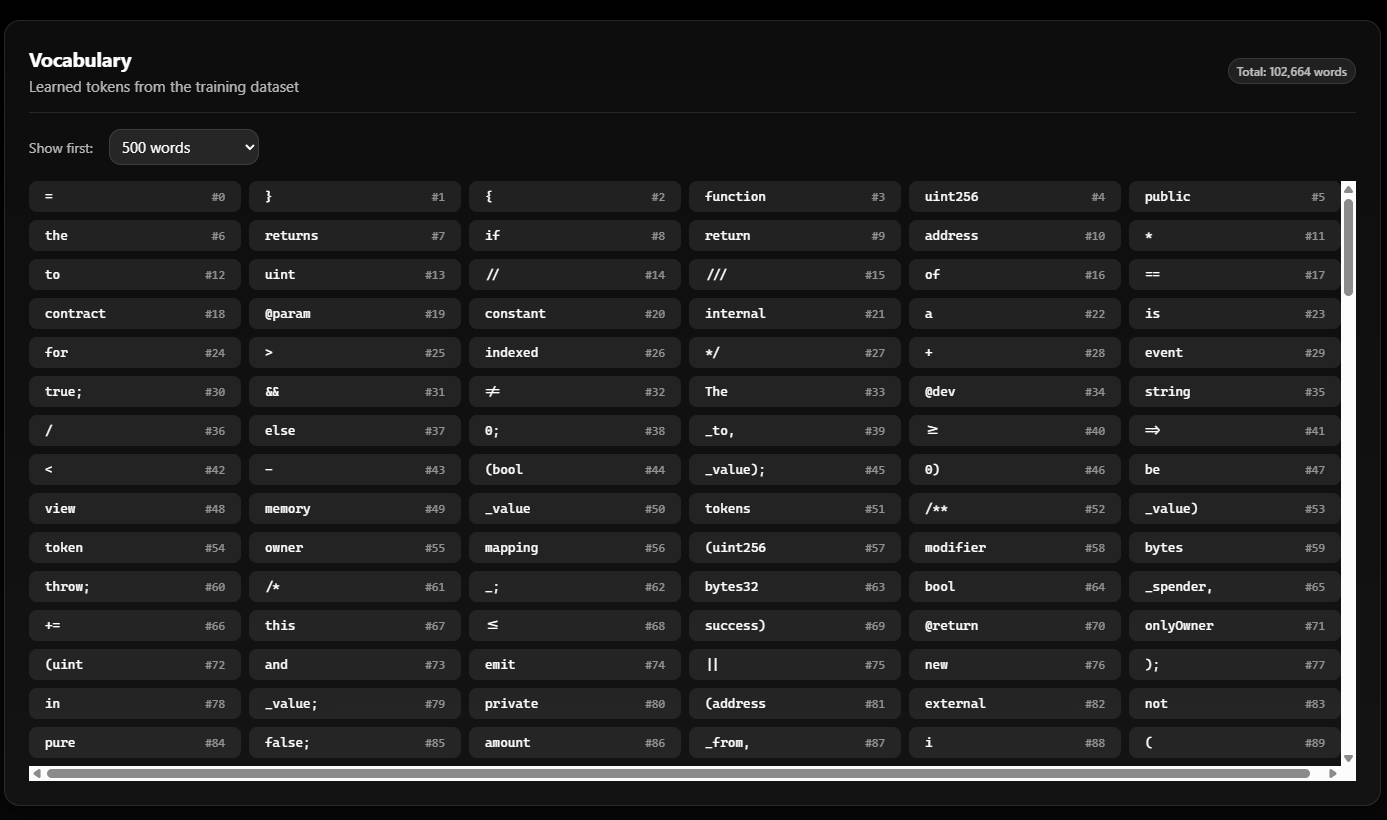
Screenshot 2026-02-18 233618 — Vocabulary page.
What you see: The Vocabulary page: “Learned tokens from the training dataset” with Total: 102,664 words. The dropdown Show first: 500 words controls how many tokens are listed. The grid shows each token and its index (#0, #1, …): Solidity keywords (function, uint256, public, returns, contract, mapping, event, etc.), symbols (}, {, *, //, ==), and common words. These are the tokens the TF-IDF + Logistic Regression classifier was trained on; the same vocabulary is used when you run Contract Analysis, and the Feature importance section in results refers to these tokens.
4. Runs — Analysis history
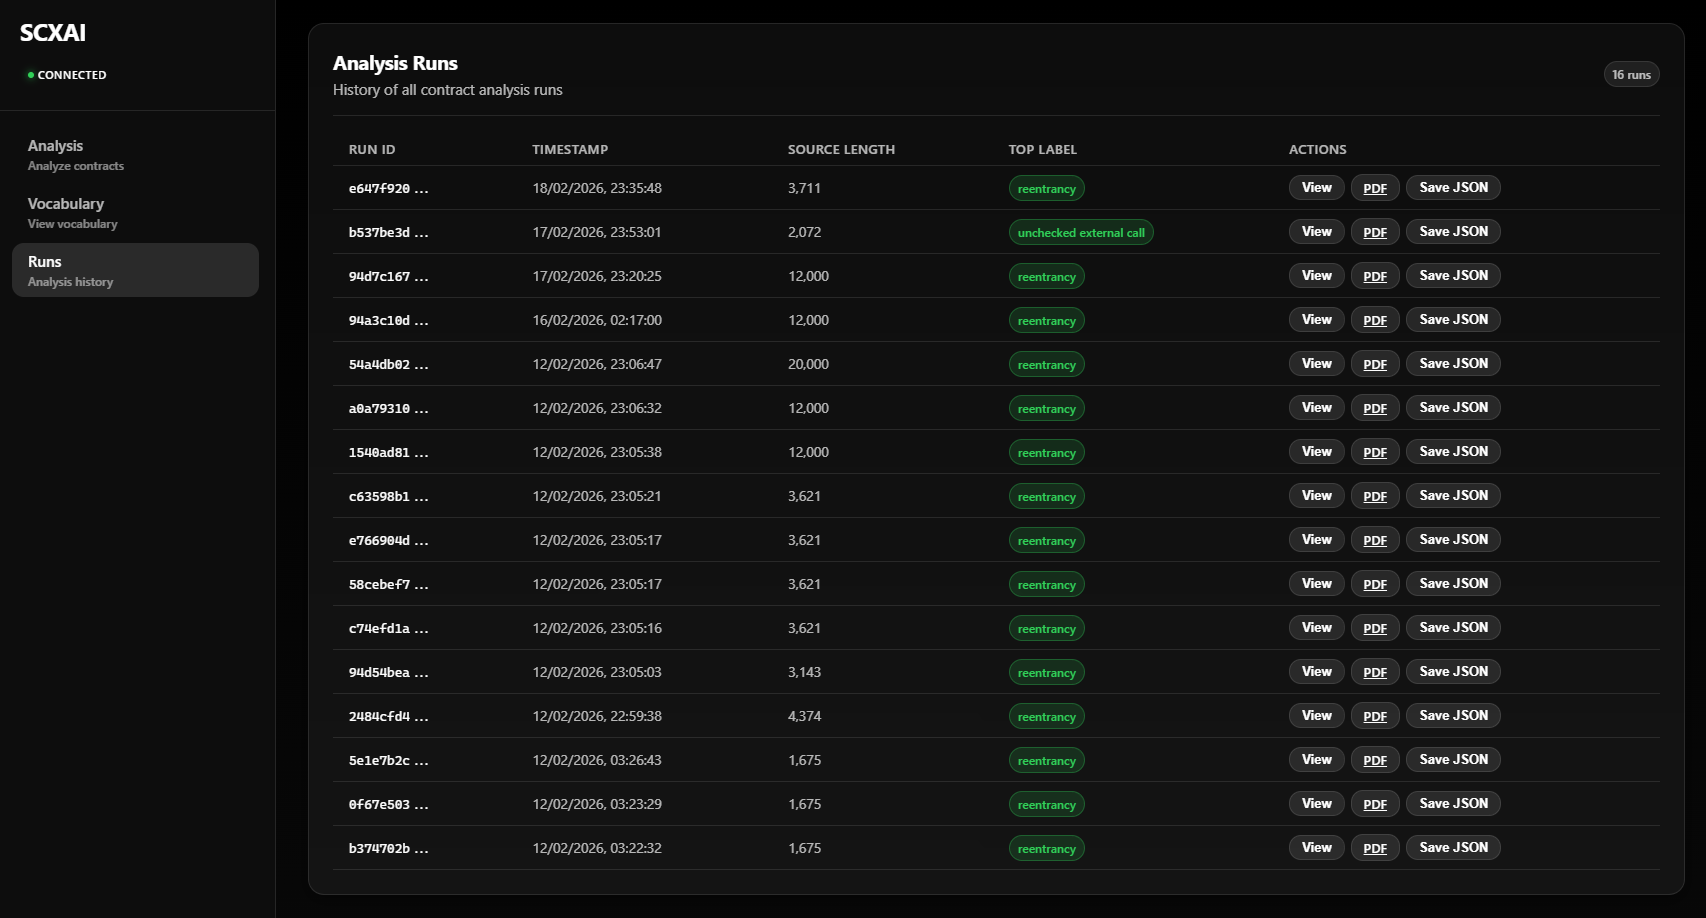
Screenshot 2026-02-18 233626 — Analysis runs list.
What you see: The Runs page (“Analysis Runs” / “History of all contract analysis runs”) with a badge like 16 runs. The table has: Run ID (short id, e.g. e647f920…), Timestamp, Source Length (e.g. 3,711 or 12,000 characters), Top Label (e.g. reentrancy or unchecked external call in a green badge), and Actions: View (open full run details), PDF (download report as PDF), Save JSON (download full run as JSON). Each row is one analysis you ran—including analyses of contracts from examples/. Use this page to revisit or export past results.